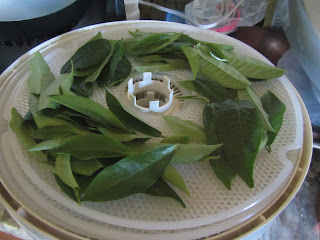
1. Wash hands and wash or otherwise fungus-proof a pair of pruning scissors or large surgical steel scissors.
2. Trim tips (from 3 to 6 leaves back) of branches of the tea bush. I like to keep the tea trees in a hedge form, about one meter high and compact enough so that I can trim the top back branches comfortably while standing in front of the tree/bush.

3. Take trimmings to kitchen table and wash hands again. Pluck leaves from stems. I like to leave the base of larger leaves attached to the stem since such leaves have a woody lower vein. On the other hand, the tips of the shoots are tender enough to be included with the leaves.

4. Place in the dehydrator for at least 1/2 hour at the lowest setting. This helps the leaves wilt. Note that in our rainforest humidity, tea leaves will take a long time to wilt in the sun, but in a drier climate you may not need the dehydrator at this stage. Just leaving the leaves out in the hot sun for an hour would likely be sufficient.
5. Wash hands again. Take out the leaves and crush, then roll lengthwise until they appear somewhat muddied and the smaller leaves start to brown. This takes a quarter hour for a small batch and proportionately longer for bigger batches. Curling the leaves into a roll lengthwise individually preserves the leaf size, but takes longer to evenly bruise the leaves than does stacking the leaves and twisting and wringing the stack like a a wet cloth. An even faster way to process larger batches by hand is to stack them about 10 cm high inside a thick ziplock plastic bag and hammer the stack flat, though that will tear individual leaves apart, making the final product not be whole leaf tea. One of the benefits of micro-batch production is the attention one can give the individual leaf: almost entirely whole leaf teas are easy to make. The goal of this stage of the process is to transform the leaves from their newly picked velvety, waxy surface gleam to a moister and darker "muddled" appearance. This liberates the oxidases and peroxidases in the leaves to do their work, breaking down the leaf cell walls to make the flavors more bioavailable and starting the oxidative production of plant melanins from other pigments.

6a. For green tea, separate the muddled leaves from any remaining thick veins and roll into desired leaf shape (ball or twisted roll).

6b. For oolong (preferred for hot) or black (preferred for iced) tea, place a shallow layer in a suitably sized bowl and cover with a towel or clean dishcloth. Allow to darken and brown, mixing and separating the leaves several times an hour, until at the desired oxidation level. This ranges from an hour or so for light (10%) oolong to overnight for black (fully oxidized) tea. I find that our tea leaves take a couple hours to reach 10% oxidation but the reactions then speed up, so more frequent checking may be required to freeze oxidation at midrange oolong stages.
7. Fry tea leaves in a dry, non-oily frying pan or wok on medium heat, turning continuously, until the steam production slows and the leaves begin to crisp. Any temperature above 92 C will inactivate the polyphenol oxidases and stop browning due to intrinsic leaf enzymes, but you also will want to stop microorganism growth from causing further fermentation. For greener teas, you will want the leaves to be raised to somewhat above the boiling point (105 C or so), or else the tea may continue to darken in storage. Avoid cooking the tea by heating to temperatures above this as that will degrade flavor.

8. Wash hands again. If desired, roll the leaves to compact them prior to drying. I often leave this step out, but if you plan to drink serial brewings of hot tea from the same leaves, tight rolling at this stage slows the first steeping and may make the second steeping a bit stronger.
9. Place back in the dehydrator and dehydrate at the "vegetable" setting (about 55 C) for a few hours or overnight. You want the tea extremely dry to prevent mold from ruining the tea in storage. This is also where keeping hands clean will pay off in shelf life.


No comments:
Post a Comment